Making parts recolourable
Assign material folders to a model's zones so customers can recolour it, set the default each part opens with, and never publish a model with nothing to click.
Uploading a model gets you something a customer can look at. Mapping its zones is what makes it configurable. It is also the step people skip, because nothing forces them to do it.
Where this happens
Open the Products page, find your model, and click Settings. The tab you want is Material groups, and its badge shows how many zones the model has.
If a model has zones and none of them have ever been mapped, the modal opens on this tab by itself. That is deliberate.
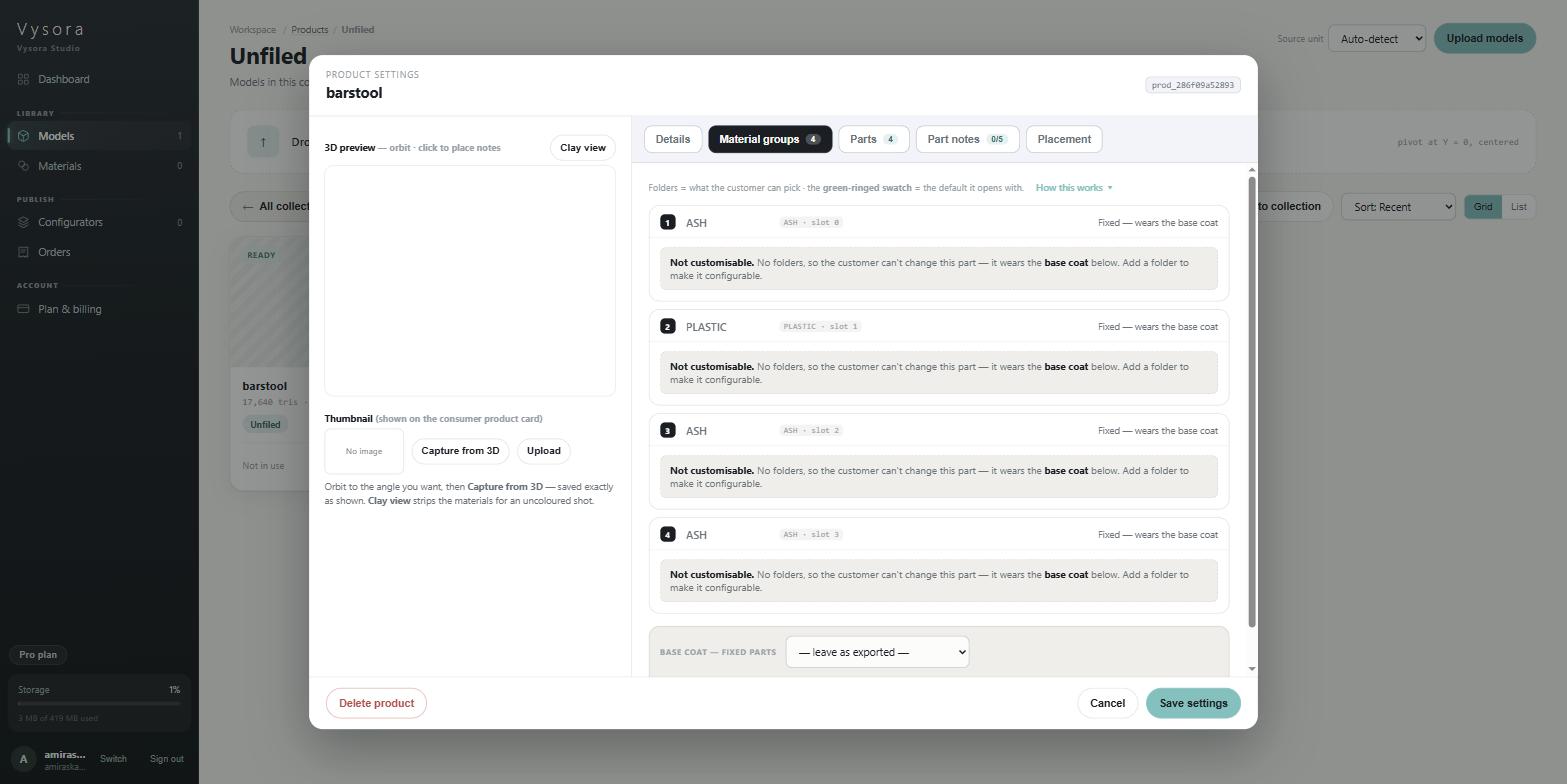
The header strip states the whole idea in one line:
Folders = what the customer can pick · the green-ringed swatch = the default it opens with.
How this works ▾ expands a fuller explanation in place if you want it while you work.
What a zone is
A zone is one independently recolourable part of the model. Technically it is one renderer from your export — one mesh and one material slot within it.
Zones are not something you create. They come out of processing, derived from how the model was exported, and Vysora shows you the ones it found. You cannot add a zone, delete one, merge two or split one from this screen. If the zones are wrong, the fix is in the 3D application: re-export the model with a separate material per part, and Vysora creates a zone for each one automatically.
That is why a model with one material can only ever be recoloured as a whole. Studio tells you so directly on the Details tab when it finds exactly one zone.
Reading a zone row
Each zone gets a card, numbered from 1, in the order the model exports them.
| Part of the card | What it tells you |
|---|---|
| Number badge | The zone's position in the list. Its stable identity, and what the 3D preview highlights by. |
| Display name field | The name the customer reads for this part. Leave it blank to fall back to the greyed-out placeholder. |
| Technical line | {name} · slot {n} — the material or mesh name from your export, and which material slot it occupies. |
Default: line |
Which material this part will be wearing when the configurator opens. |
+ Folder |
Adds a swatch set to this part. |
Trust the technical line when you are working out which card is which part. Here is the barstool used throughout this site:
1  ASH      ASH · slot 0
2  PLASTIC  PLASTIC · slot 1
3  ASH      ASH · slot 2
4  ASH      ASH · slot 3
One mesh, four zones, and three of them called ASH. That is an ordinary export from 3ds Max with a Multi/Sub-Object material, and it is exactly why a zone is identified by its slot number rather than by its name. Three zones named ASH stay three separate zones with three separate settings. They are the seat, the footrest and the frame, and you can give them different ranges.
When the names are this unhelpful, let the 3D preview tell them apart: hover a zone card and the matching part glows blue in the preview on the left. It works in both directions — click a part in the 3D view and its card highlights.
Give each zone a display name while you are here. Seat and Legs mean something to a customer. ASH does not.
Assigning folders to a zone
A zone with no folders shows this, and does nothing for anybody:
Not customisable. No folders, so the customer can't change this part — it wears the base coat below. Add a folder to make it configurable.
Press + Folder to fix it. The popover is headed Make this part configurable on a bare zone, and Give the customer more options once the zone already has one, and it lists every folder from your materials library with the number of materials in each.
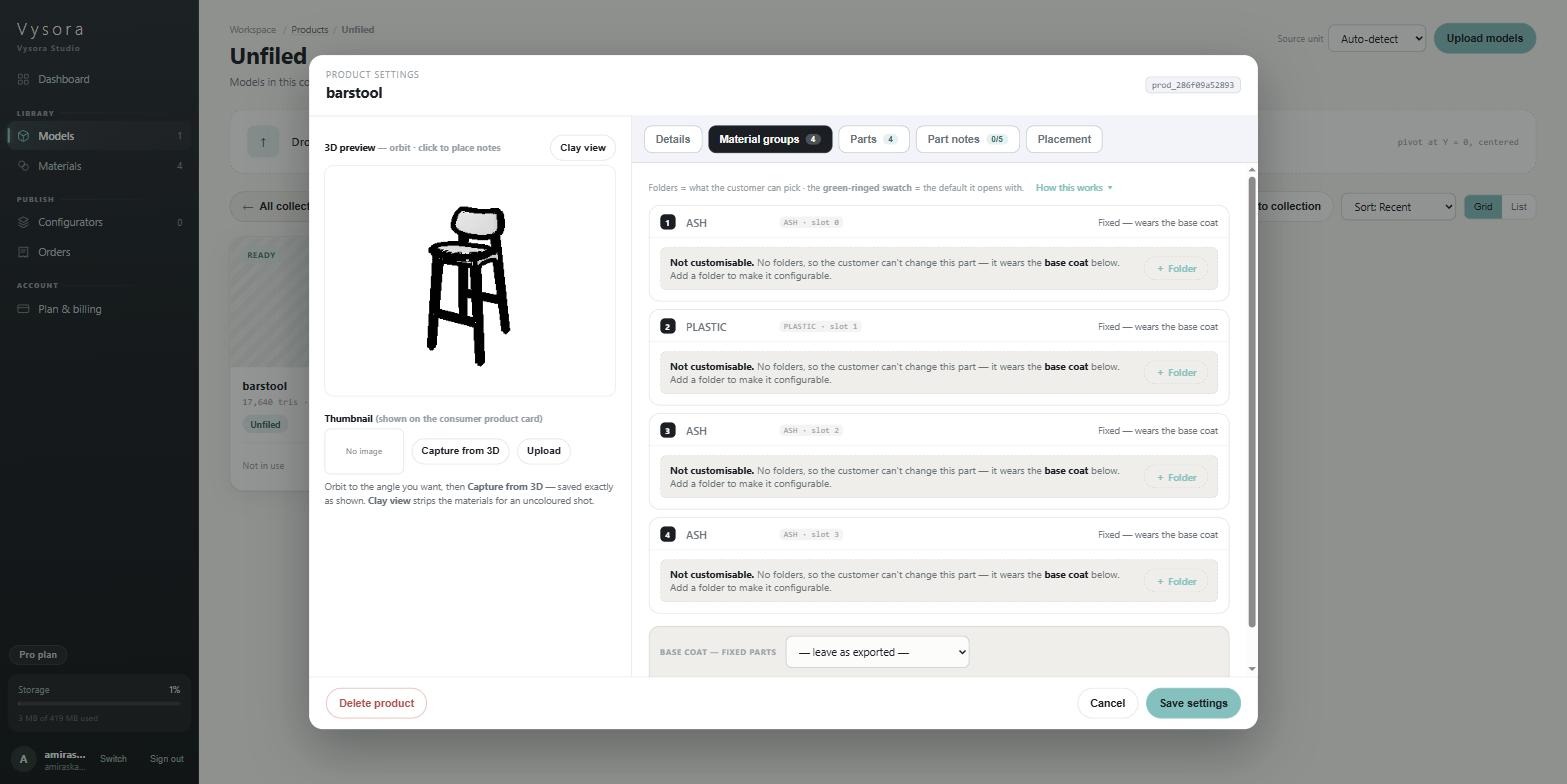
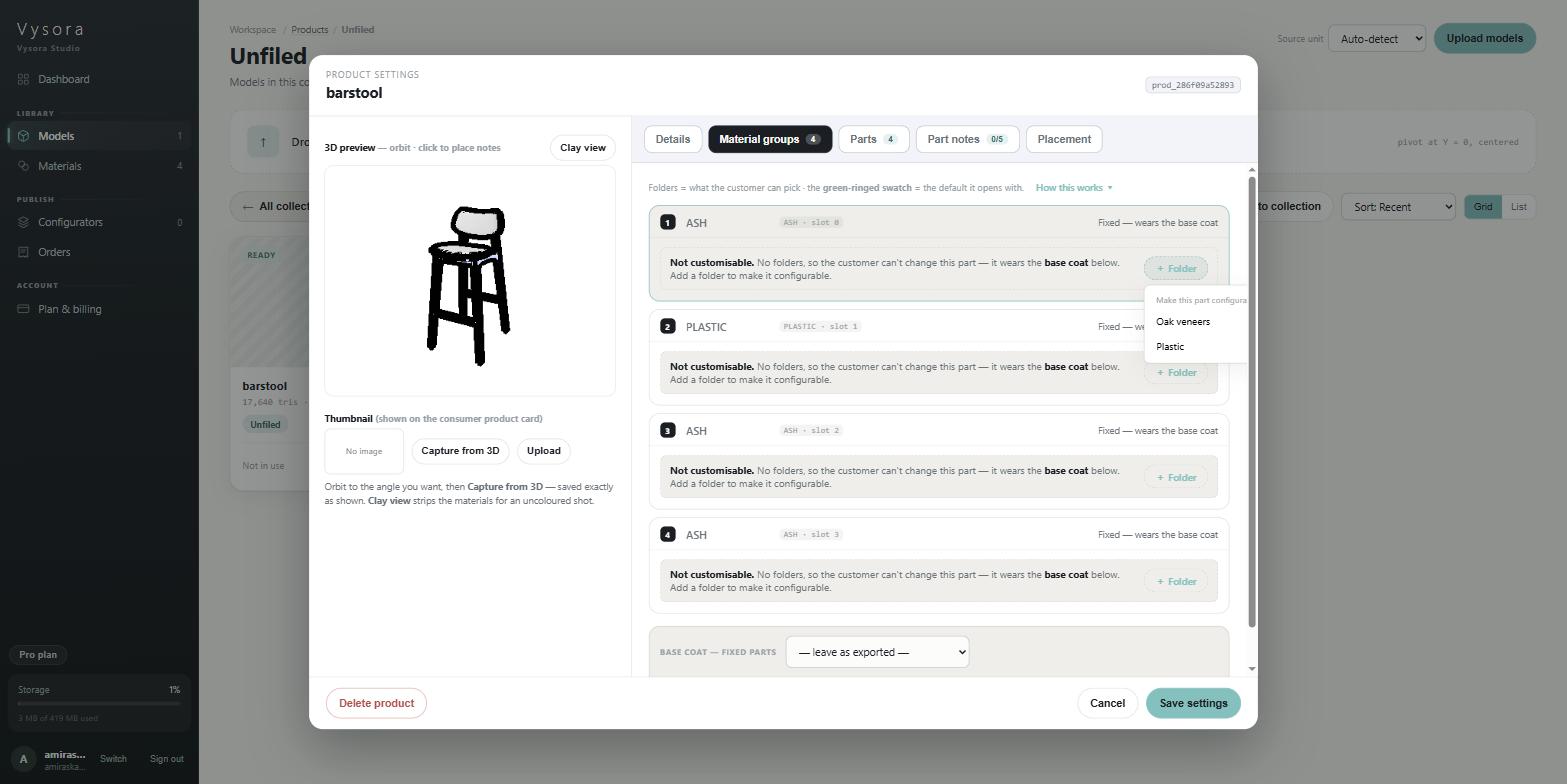
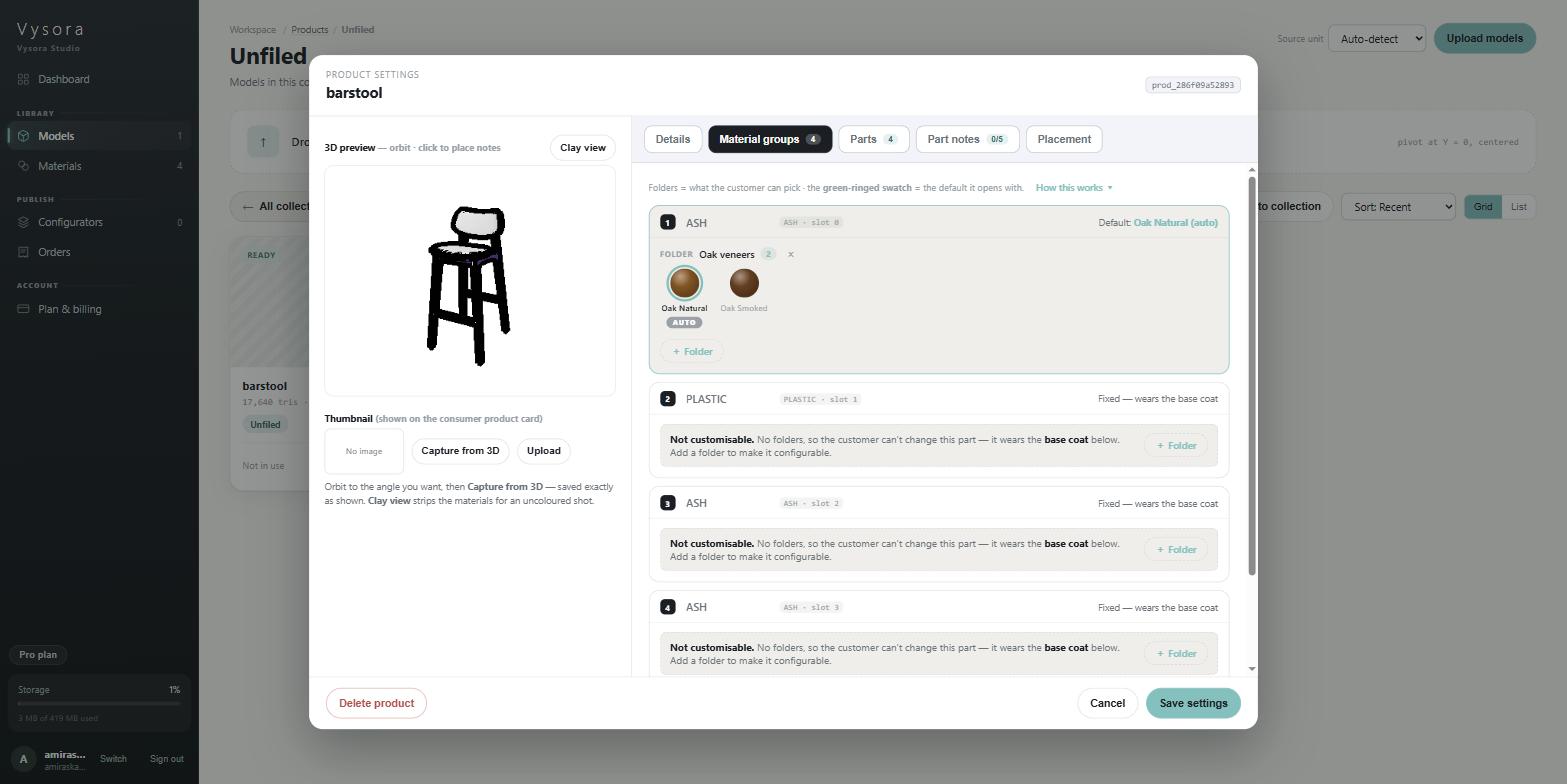
Click a folder and it is attached immediately. The swatches appear on the card at once, laid out exactly as the customer will see them.
Five things that catch people out:
- A zone can hold more than one folder. Add
Oak veneersandPlasticto the same zone and the customer gets all four materials as options on that part. Each folder sits in its own labelled block with its own count. + Folderonly appears while there is a folder you have not already added to that zone. Once every folder is on the zone, the button disappears. That is not an error.- If your materials library is empty,
+ Folderdoes not appear at all. Build at least one folder with materials in it first. TheDetailstab is the only place that says so, withNo materials yet — create some in the Materials library first. - A folder with no materials in it can still be assigned. Its count badge renders as a warning and the zone reads
No materials in this folder yet — add some in the Materials library.The zone counts as assigned but gives the customer nothing to pick, so catch it before you publish. - Removing a folder is instant and unconfirmed. The
×on a folder block takes it off the zone straight away. The only warning is the tooltip,Remove folder — the customer loses these options.
What the customer gets
Every material in every folder on a zone becomes a swatch the customer can pick for that part. Nothing else about the folder crosses over — not its name as a heading, not any ordering you imagined. The folder is the selection mechanism, which is why reorganising the materials library changes what shoppers see.
The default each part opens with
One swatch on each zone carries a green ring. That is the material the part wears the moment the configurator loads, and it is what the 3D preview and any captured thumbnail show.
A zone gets its default in one of two ways, and the difference matters.
| Tag on the swatch | What it means |
|---|---|
DEFAULT |
You pinned it. Click a swatch to pin it; click the same swatch again to un-pin it. |
AUTO |
Nothing is pinned, so Vysora is falling back to a rule. Rendered in grey. |
The auto rule is exact: the first material of the first non-empty folder on the zone. It is the same rule the player uses, so what carries the green ring in Studio is genuinely what a customer will load first.
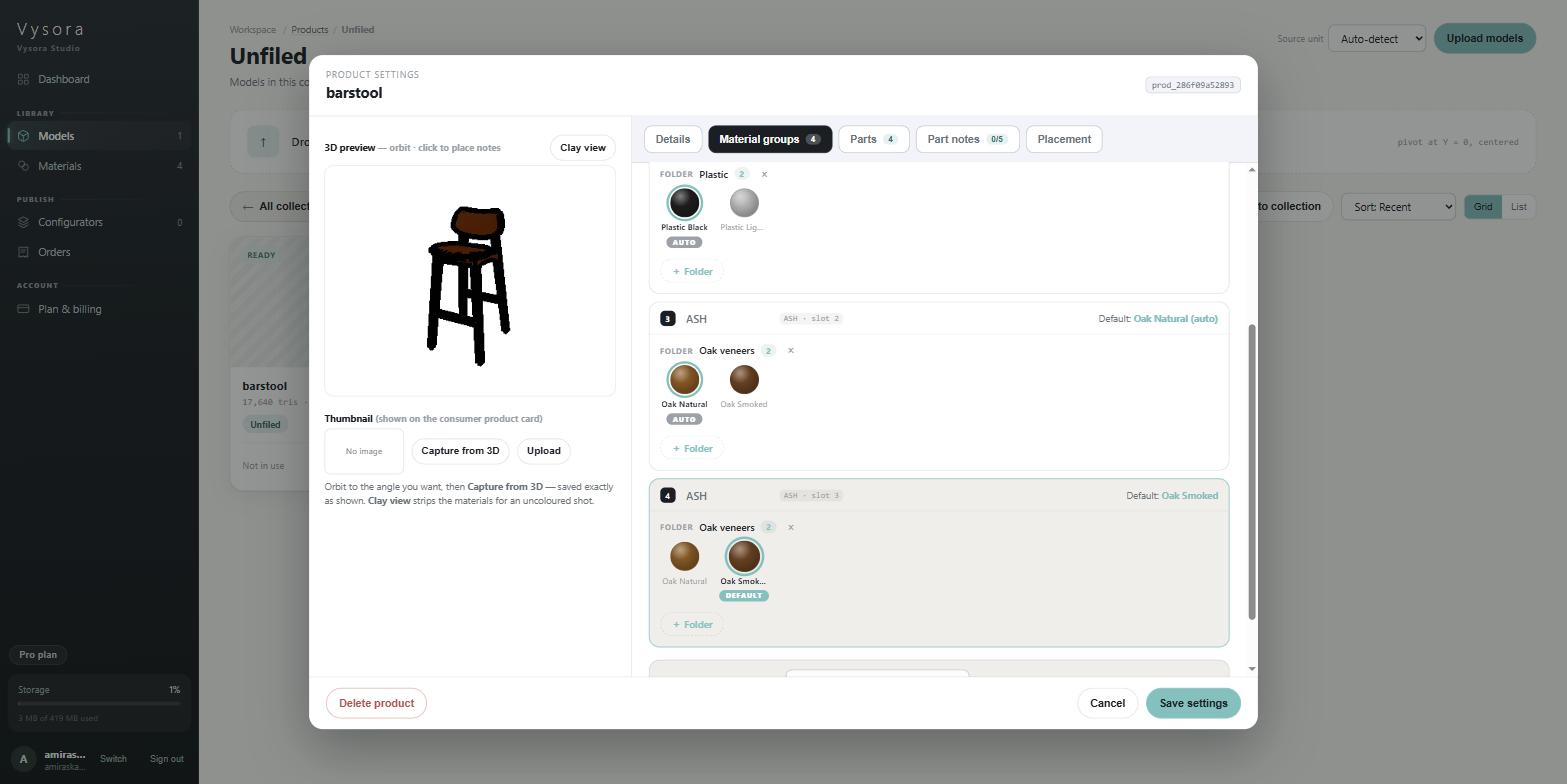
Pin a default whenever you care what the model looks like on first load, which is most of the time. An auto default silently changes the moment you rename a material, add a material that sorts differently, or move one between folders.
If a material you pinned is later deleted, or moved out of every folder on that zone, Studio shows the problem rather than hiding it. The Default: line turns a warning colour and reads {name} — not in folders, with an explanation underneath:
Saved default "Oak Natural" is no longer in this zone's folders — click a swatch to replace it, or it falls back to auto.
Click any swatch to pin a replacement.
Zones you do not want configurable
Not every part should be recolourable. A chrome foot, a hidden bracket, a screw: leave those with no folders and they read Fixed — wears the base coat.
At the bottom of the tab, below all the zone cards, is Base coat — fixed parts. Pick any material from your library and every unmapped zone wears it, so fixed parts still match the set rather than defaulting to whatever the file happened to carry. Leaving it on — leave as exported — keeps the model's own materials on those parts.
The hint under it says what it is for: Painted on zones with no folders so fixed parts still match the set.
Two limits on the base coat. It applies only to zones with no folders, and a mapped zone ignores it entirely. And the 3D preview in this modal does not show it: unmapped zones render as neutral grey in the preview whatever base coat you choose. The published player applies it; the preview here does not.
The live preview
The preview on the left of the modal is tinted with each zone's effective default, so it always shows you the first-load look of the model as currently configured. Change a default and the preview follows.
It is a stylised view, not the finished render. It shows flat colour, metallic and roughness only, so a material with a texture map appears here as its base colour rather than as its texture. Unmapped zones stay neutral grey. Clay view strips all the tinting to plain grey, which is what you want before capturing a clean thumbnail.
Hovering a zone card lights the matching part. Clicking a part in the preview highlights its card, though with a long zone list the highlighted card may be further down than you can see. Scroll to find it.
The barstool, end to end
The barstool has four zones and the library has two folders: Oak veneers (Oak Natural, Oak Smoked) and Plastic (Plastic Black, Plastic Light Grey).
- Open the barstool's
Settingsand land onMaterial groups. Four cards, all readingNot customisable. - Hover each card in turn and watch the preview to work out which is which. Zone 2,
PLASTIC · slot 1, is the moulded seat shell. Zones 1, 3 and 4 — all calledASH— are the timber parts. - On zone 1, type
Seat frameas the display name, press+ Folderand choose Oak veneers. Two swatches appear and Oak Natural takes the green ring with anAUTOtag, because it is the first material of the only folder. - Do the same on zones 3 and 4, naming them for what they are:
LegsandFootrest. - On zone 2, name it
Seat shelland add Plastic. Two more swatches, Plastic Black ringed automatically. - Decide the opening look. If you want the stool to load in Oak Smoked with a light grey shell rather than the alphabetical first of each, click those two swatches to pin them. They pick up the
DEFAULTtag and the preview updates to match. - Leave the base coat on
— leave as exported —. There are no unmapped zones left to paint. - Press
Save settings.
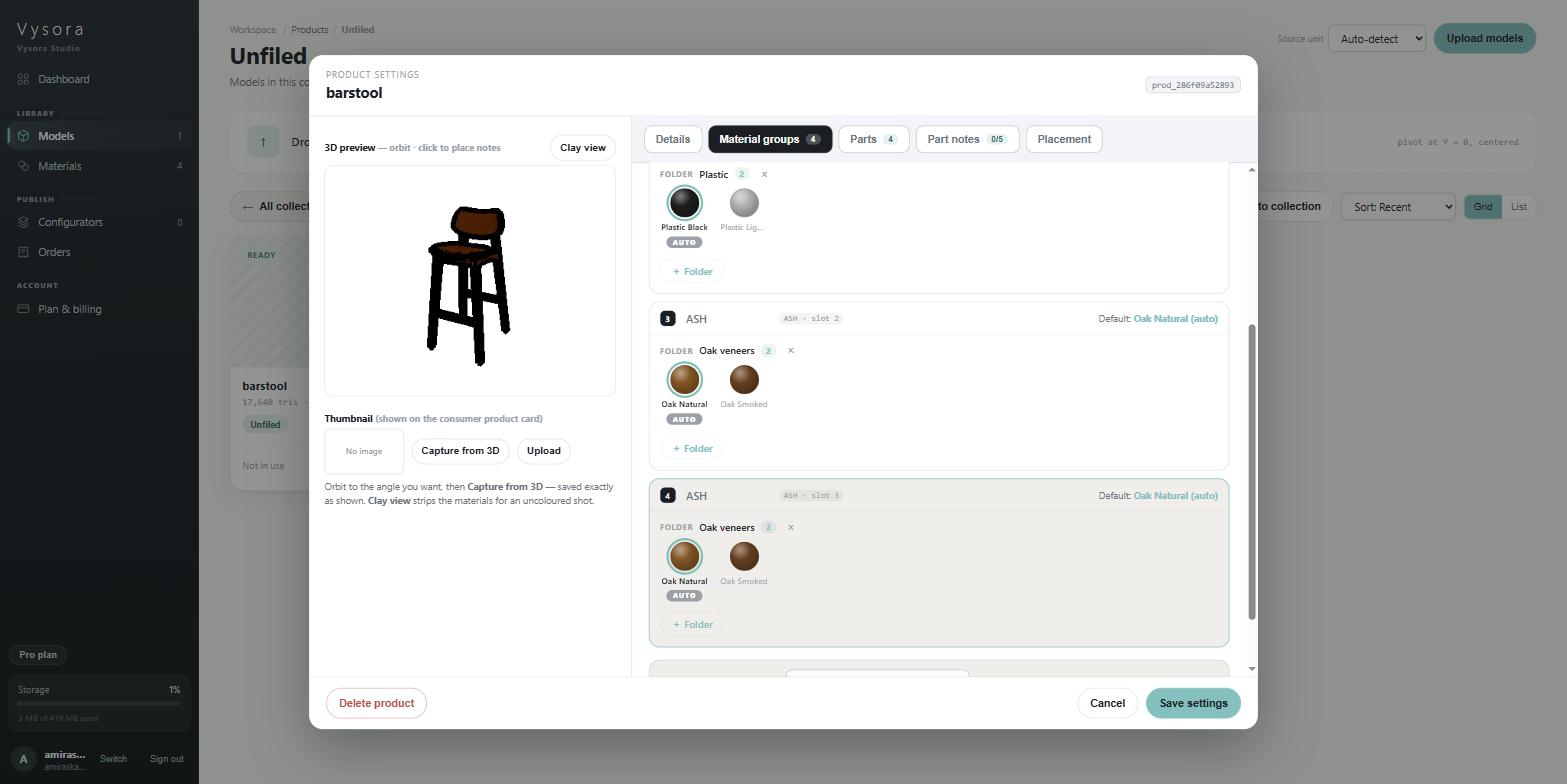
The Details tab now summarises it as 4 of 4 assigned — Oak veneers, Plastic. That line is the fastest check on any model: open Details, read the ratio, and if the two numbers do not match, find out why before you publish.
Saving, and getting it to customers
Save settings writes the mapping to the model. Nothing on this screen publishes anything.
If a model still shows No renderer data yet — the product must finish processing (READY)., it has not finished processing. Close the modal, wait for the status pill to change, and come back. Do not save a product in that state: it writes an empty part list and clears any mapping that was already there.